

Many times during developing some application it becomes important to show the progress to someone over the internet.
Most of the time we end up using some screen sharing software. That, however, can only show my screen to the other person. They cannot really interact with the application.
We can use some software for remote desktop sharing but then I cannot work while the other person is using my screen.
One very nice solution is ngrok, which essentially creates a tunnel from the local system to ngrok’s servers and gives a nice URL.
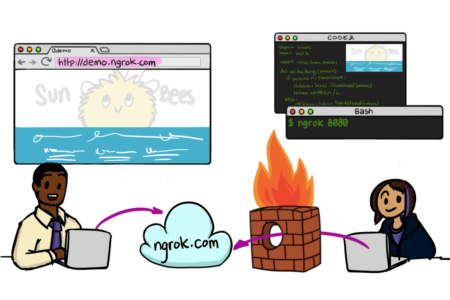
However, I was a bit concerned since all my traffic was getting redirected via ngrok’s servers.
I was looking around for something which would do the same thing but via my servers and finally came across inlets. This is an open source project, written in Go, which can be easily self hosted.
From their site
inlets creates a tunnel between two networks using a websocket and optional TLS for encryption. The main use-case for inlets is to expose a private API or service on the Internet, or to gain incoming network access (ingress) to a private network.
For this to work, three things are required –
1 inlets needs to be set up on a server (preferably over https)
2 inlets has to be running locally on a client
3 a program to run locally which serves over localhost
Thanks to Ruan’s blog post which got me going on this.
Configure inlets to run on server
Running inlets on the server is actually very straightforward.
curl -sLS https://get.inlets.dev | sudo sh
This puts the inlets program into /usr/local/bin/inlets so that it’s accessible everywhere.
Create a token variable
This should be a sufficiently long arbitrary string to provide security to the connection
$> export INLETSTOKEN=$(head -c 16 /dev/urandom | shasum | cut -d" " -f1)
$> echo $INLETSTOKEN
99377fd98062f1559aef634dba7d508443f58979
To see it –
$> echo $INLETSTOKEN
99377fd98062f1559aef634dba7d508443f58979
Copy paste it since it is going to be required from the local machine
Run inlets server
Now run inlets with this token
$> inlets server --port=8000 --token=$INLETSTOKEN
2020/02/22 02:04:14 Welcome to inlets.dev! Find out more at https://github.com/inlets/inlets
2020/02/22 02:04:14 Starting server - version 2.6.4
2020/02/22 02:04:14 Server token: "99377fd98062f1559aef634dba7d508443f58979"
2020/02/22 02:04:14 Control Plane Listening on :8000
2020/02/22 02:04:14 Data Plane Listening on :8000
Configure nginx to direct a URL to inlets server
This was the bigger challenge for me as I had to try different variations of the nginx configuration until I could get this working!
You should use a URL which should only be used for Nginx. So, something like –
inlets.<your domain>
Create a nginx conf file.
server {

  listen			80;
  listen			443 ssl;
  server_name		<inlets URL>;

  ssl_certificate <SSL certificate path>;
  ssl_certificate_key <SSL certificate key>;
  include /etc/letsencrypt/options-ssl-nginx.conf;
  ssl_dhparam /etc/letsencrypt/ssl-dhparams.pem;

  error_log 		/var/log/nginx/inlets_error.log;
  access_log 		/var/log/nginx/inlets_access.log;

  location / {
    proxy_set_header X-Forwarded-For $proxy_add_x_forwarded_for;
    proxy_set_header Host $host;

    proxy_pass http://ws-backend;

    proxy_http_version 1.1;
    proxy_set_header Upgrade $http_upgrade;
    proxy_set_header Connection "upgrade";
  }


  location /tunnel {
    proxy_http_version 1.1;
    proxy_set_header Upgrade $http_upgrade;
    proxy_set_header Connection "upgrade";
    proxy_read_timeout 86400;
    proxy_pass "http://127.0.0.1:8000/tunnel";
  }

}

upstream ws-backend {
  server 127.0.0.1:8000;
}
I created separate log files for error and access so that I could identify the issues in case it doesn’t work.
Reload nginx for the configuration to take effect –
$> nginx -s reload
run a program locally which serves over localhost
I ran a simple rack server for testing purposes. This is a ‘config.ru‘ file –
run lambda { |env|
  [
    200,
    {'Content-Type' => 'text/html'},
    ['Hello World!']
  ]
}
And ran it using –
$> rackup
* Version 3.11.2 (ruby 2.4.2-p198), codename: Love Song
* Min threads: 0, max threads: 16
* Environment: development
* Listening on tcp://localhost:9292
Use Ctrl-C to stop
run inlets locally on your computer
Download inlets to the local system and run it using –
inlets client --remote wss://localhost.abhij.it --upstream=<inlets URL>=http://127.0.0.1:9292 --token=99377fd98062f1559aef634dba7d508443f58979
The token should be the same as the one used on the server.
Now, visit your URL to see your progrom output on a website!
Additional considerations on server
Since the inlets server is running in the foreground, it’s better to make it a service so that it runs in the background always. Also, it should start on boot.
Also, the inlets auth token should be saved in file so that the inlets server can access it.
save auth token to a file
$> echo "AUTHTOKEN=99377fd98062f1559aef634dba7d508443f58979" > /etc/defaults/inlets
create an inlets service file and save it in /etc/systemd/system/inlets.service
$> cat /etc/systemd/system/inlets.service
[Unit]
Description=Inlets Server Service
After=network.target

[Service]
Type=simple
Restart=always
RestartSec=1
StartLimitInterval=0
EnvironmentFile=/etc/defaults/inlets
ExecStart=/usr/local/bin/inlets server --port=8000 --token="${AUTHTOKEN}"

[Install]
WantedBy=multi-user.target
Stop the server if it is running in the foreground and start the inlets service
$> systemctl start inlets
Additional considerations on local computer
For running inlets on my local computer I just created an alias –
alias pipe=./path_to_inlets client --remote wss://localhost.abhij.it --upstream=<inlets URL>=http://127.0.0.1:$1 --token=99377fd98062f1559aef634dba7d508443f58979
Here, the $1 variable gets replaced with whatever port I give from the command line.
So, now I just have to run –
$> pipe 9292